Passwordless SSH logins using private keys and .ssh/config

These instructions will work on any computer that uses OpenSSH such as macOS or most Linux/Unix systems. The process for generating keys on other platforms will vary but the general principle is the same.

  • Open your Terminal app and generate a new key pair by typing ssh-keygen at the shell prompt. You should see:
Generating public/private rsa key pair.
Enter file in which to save the key (/home/username/.ssh/id_rsa):

Press Enter to confirm the default location (that is, ~/.ssh/id_rsa) for the newly created key and the press enter twice more when prompted for a passphrase.

  • After this, you will be presented with a message similar to this:
Your identification has been saved in /home/username/.ssh/id_rsa.
Your public key has been saved in /home/username/.ssh/id_rsa.pub.
The key fingerprint is:
e7:97:c7:e2:0e:f9:0e:fc:c4:d7:cb:e5:31:11:92:14 alfie@example.com
The key's randomart image is:
+--[ RSA 2048]----+
|             E.  |
|            . .  |
|             o . |
|              . .|
|        S .    . |
|         + o o ..|
|          * * +oo|
|           O +..=|
|           o*  o.|
+-----------------+
  • Change the permissions of the ~/.ssh/ directory to 700 to ensure it is only accessible by your user ID:
$ chmod 700 ~/.ssh
  • Copy the content of ~/.ssh/id_rsa.pub into the ~/.ssh/authorized_keys on the machine to which you want to connect, appending it to its end if the file already exists.
  • Set the permissions of the ~/.ssh/authorized_keys file using the following command:
$ chmod 600 ~/.ssh/authorized_keys

How to create an SSH shortcut

To create a custom ssh connection so you don’t need to type the IP address of your server every time, type from your home directory:

nano .ssh/config

then enter the following below

Host shortcutname
HostName 10.11.12.13
IdentityFile ~/.ssh/id_rsa
PreferredAuthentications publickey
Port 22
User root

Save the file and exit nano. You can now connect to the server using the command ssh shortcutname without having to enter any additional connection information or password.
Upcoming USA1 datacenter migration

What is happening?

Over the coming weeks we will be migrating customers hosted out of our usa1 (Chicago) datacenter to a new datacenter facility which is also located in Chicago approx 2 miles away.

Why?

The new facility offers us higher power availability, better connectivity and more redundancy. We are also taking this opportunity to complete the roll-out of improved firewall and encryption subsystems on our virtualization hypervisors to further improve our cyber security defenses.

What is the impact?

Affected customer VMs will be migrated one by one to new hardware running in the new datacenter. Both facilities are connected by a VLAN which will facilitate seamless transition of IP traffic. No IP renumbering or other changes will be required. Once migration is complete you can expect lower latency, faster performance and better security.

Migration will require a brief disruption while we sync changed data and reboot VMs on new hardware. We will schedule migrations with affected customers individually at the most convenient time slots.

Questions?

Please contact support@anu.net if you have any questions about this migration.

How to check if your IP address is blocked by our firewall

Our Hosted Email and Web Hosting services are protected by multiple layers of security systems, one of which is a brute force attack detection mechanism. A brute force attack is when a malicious user keeps trying to access your account over and over again using commonly used passwords or by guessing what your password might be. Blocking this kind of attack is a very effective way of protecting your sites and email accounts from malicious access.

Every now and again it happens that a legitimate user forgets their password or mistypes it a few times and ends up blocking themselves. This can be very frustrating, so to make your life easier we have build a little utility that you can use to check if you’ve been blocked by our firewalls, and you can even use it to unblock yourself immediately.

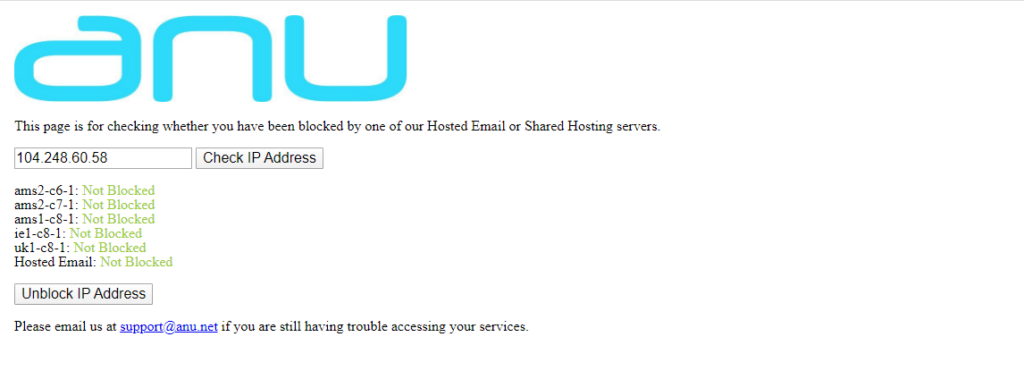
To check your IP address if it’s blocked on any of our servers just visit https://blocked.anu.net/

Once loaded you should be able to see something like the picture below

NOTE: IP address is auto detected so if you want to check an IP address from a different location, just replace the detected IP address on the search box with the IP address you want to check.

If you are seeing “Not Blocked” next to all the servers then that means you are not blocked by our firewalls. You should be able to access your sites and email accounts.

If you are seeing one of the server is showing as “Blocked” in red letters, then you can just click on “Unblock IP Address” button to unblock yourself.

If you are still having difficulty accessing your website or email address, or if you encounter any difficulties with the self service unblocking tool, please do not hesitate contact us via live chat or by email to support@anu.net.